Knitters needed for poppy project
Red knitted poppies are needed for this year’s Anzac Day celebrations, the more the merrier.
Waikato District Council and the Ngaruawahia Community House plan to create a blaze of poppies along the Te Awa Cycle Way, and over the Perry Bridge.
More than 1200 poppies are needed for the project, which will help mark the centenary of World War I’s final year.

Anyone interested is welcome to drop in to the Community House, 13 Galileo St, Ngaruawahia, and pick up some wool.
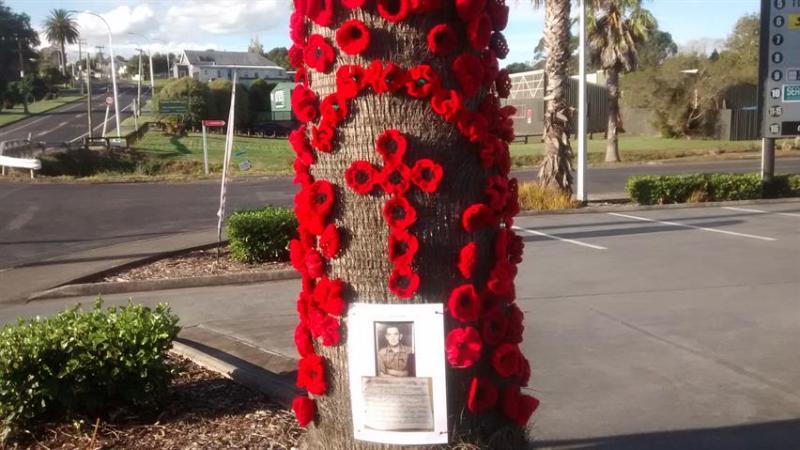
They also hope to make more than 5000 red poppies for the Anzac Poppy Tree project.
Last year community groups decorated trees with thousands of red knitted poppies in a district-wide ‘yarn bombing’ street art project. Port Waikato, Matangi, Tuakau, Pokeno, Huntly, Ngaruawahia, Raglan, Glen Massey and Te Kauwhata enthusiastically knitted for months and the first of many trees ‘blossomed’ in Garden Place, Huntly on Friday 7 April.
Waikato communities have been asked to identify a tree trunk which could be covered in knitted poppies, before Monday 9 April to give time to attach the poppies. They can reflect the individual interpretations of each community – last year Port Waikato created a special Anzac tree out of driftwood for their knitted poppies.

“We appreciate all support and look forward to working with everyone on this exciting project!”
If you know someone who can knit, or want to have a go yourself – email Lianne van den Bemd Waikato District Council, or Anne Ramsey Ngaruawahia Community House, ph 07-824 8340.
They will also happily send out a poppy pattern.
Anzac Day is on Wednesday 25 April.
Here are the knitting patterns for all those keen to try –
 Large Poppy
Size 8 (4.0mm) needles and 8 ply (double knit) wool
Use garter stitch throughout
Cast on 100 stitches
Knit 16 rows
Knit 2 together all of next row (50 stitches)
Knit 3 rows
Knit 2 together all of next row (25 stitches)
Knit 3 rows – I knitted 1 row
Slip 1 knit 2 together pass slip stitch over all of next row (knit the last stitch)
Thread wool through stitches left on needle, tighten and tie off securely
Can make black centre using wool, a button or felt. the choice is yours.
Ing’s gorgeous ribbed poppy
Abbreviations – UK/AUS Ch – chain Sl st – slip stitchSt – stitch Dc – double crochet Tr – treble Fptr – front post treble (yarn over, hook from right to left of treble post, yarn over, pull thru 2 st, yarn over, pull thru remaining 2 st)
Colour B – 4 ch 9 tr into first ch (4th from hook) sl st to join & fasten off.
Colour A – join at top of any tr st
R1 : Dc + 1ch into same st (this is 1st tr)*Fptr into next st, 1 tr into top same tr*. Repeat from * to *, fptr into next st, sl st to top of 1ch, 1ch
R2: 1dc 1ch into same as sl st, 1 tr into next (fptr), *1 fptr into same tr post, 1 tr in next 2tr*, repeat from * to * fptr into next st, sl st to top of 1ch, 1ch
R3: 1dc 1ch into same as sl st, 1 tr into next 2 tr, *1 fptr into same tr post, 1 tr in next 3tr*, repeat from * to * fptr into next st, sl st to top of 1ch Fasten off.
Keep repeating row 3 to make a lager poppy. This can be pulled in and stitched if you want a more defined poppy shape
Decorate centre with small button, embroider or leave black as preferred.
But wait – there’s more!
Megan’s quick and easy poppy pattern

Number 8 Network’s friend Megan Mills, who runs one of Auckland’s top knitting groups in her home, has developed a special poppy pattern for this project – and also because they’re bloomin’ pretty.
This is especially suited for a beginner, as the pattern is quick and easy to make, doesn’t use up much wool and the poppy small and pretty. Ideal, says Megan, to pop on a hat or jacket (after you’ve made a few for the Anzac project, of course!)
“I hope this one brightens your day.”
Megan’s Quick Ribbed Poppy
Materials:
Scraps of red and black double knitting (8-ply) wool yarn
1 pr 3.5 mm needles (this is smaller than usually recommended so the poppy won’t be floppy)
Wool darning needle to sew the small seam and weave in ends
Scissors
Size: Approx 5 cm across (when sitting in its finished, slightly cupped, shape)
Time: Approximately 20 minutes to knit and another 10 minutes to finish. You may be a bit slower to start with, but after a couple you will get much faster.
| Abbreviations: | |
| K | knit |
| P | purl |
| K2T | knit two together (a right-leaning single decrease) |
| P2T | Purl 2 together |
Tip: Leave all tails about 15cm long so you can use them for finishing.
Ribbed petals
With red loosely cast on 36 stitches.
Rows 1 to 6: (K2, P2) to end.
Break off yarn.
Black “button” centre
Row 1: K2T across the row. (You now have 18 sts)
Row 2: K.
Row 3: P2T across the row, break off yarn. (You now have 9 sts)
Overall finishing
Thread last tail on needle and, starting from the opposite end of the row to where the tail is, run it through all 9 sts on the needle twice so you can draw the centre up into a ring. Use the remainder of the tail to seam just the black side seam of the poppy closed. End with the tail on the back of the poppy.
Now you will have two black tails beside each other and a ring of black on the back of the poppy from the row where you changed colour. If necessary adjust the size of your first black stitch from when you changed colours. Weave each tail, in opposite directions around that ring, taking the tails through all the little black loops.
When they meet on the opposite side of the ring continue weaving so the tails meet back at the beginning of the ring. Tie them together very tightly, pulling the black centre into a “button” on the front of the poppy. Trim the tails, leaving them long enough to hide away in the centre button. Alternatively you can leave them long and take one tail to the other side of the centre at the back and leave the tails for attaching the poppy to something.
Now use the red tail from the cast-on edge to sew a tiny seam from the outside edge towards the centre of the poppy. When you get to the black centre the two red tails will be beside each other. If necessary adjust the size of your last red stitch from when you changed colours. Tie the red tails together if you wish before you continue to tidy them away and trim them. I take them towards the centre button and hide these ends in there too. As with the black tails, you may choose to leave these tails so they can be used to attach the poppy to something.
Pull the fabric of the poppy a bit to make it lie how you like. It is meant to be slightly cupped.
Good luck, and good knitting! If you make some of these poppies, please let me know!


